
TuneRS technical resources
3-Quart Accusump & External Oil Cooler
Accusump mounting, remote filter, check valve and external cooler routing.

Before you begin
TRS ACCUSUMP 3 QUART SYSTEM WITH EXTERNAL COOLER
AND HEAT EXCHANGE DELETE KIT Please note: these instructions are based on installing the kit into a 986 Boxster. We have done this same installation procedure on 987 Boxster and 987 Caymans with a few modifications. Not all installations are done the same way with every shop, this is only a guide based on our in shop installation. If you wish to have a length of hose cut with fittings separate to run the cooler in a different way, please notify us of this upon order.
Installation
1Step 1Mount the Accusump and electric valve
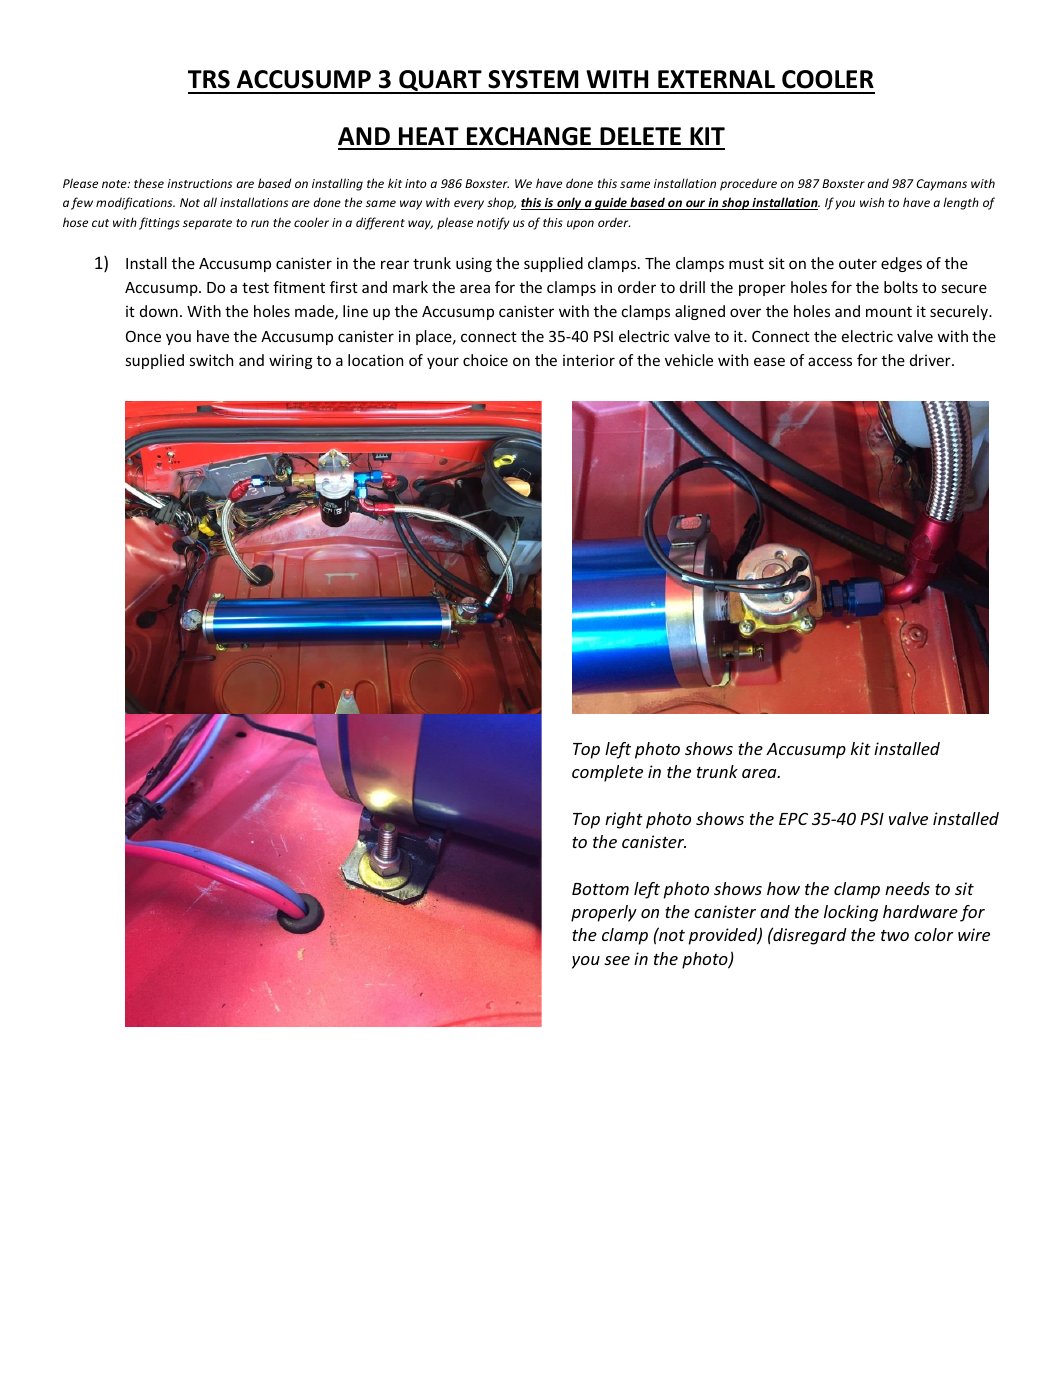
Install the Accusump canister in the rear trunk using the supplied clamps. The clamps must sit on the outer edges of the Accusump. Do a test fitment first and mark the area for the clamps in order to drill the proper holes for the bolts to secure it down. With the holes made, line up the Accusump canister with the clamps aligned over the holes and mount it securely. Once you have the Accusump canister in place, connect the 35-40 PSI electric valve to it. Connect the electric valve with the supplied switch and wiring to a location of your choice on the interior of the vehicle with ease of access for the driver.
Top left photo shows the Accusump kit installed complete in the trunk area.
Top right photo shows the EPC 35-40 PSI valve installed to the canister.
Bottom left photo shows how the clamp needs to sit properly on the canister and the locking hardware for the clamp (not provided) (disregard the two color wire you see in the photo)
2Step 2Mount the remote oil filter base
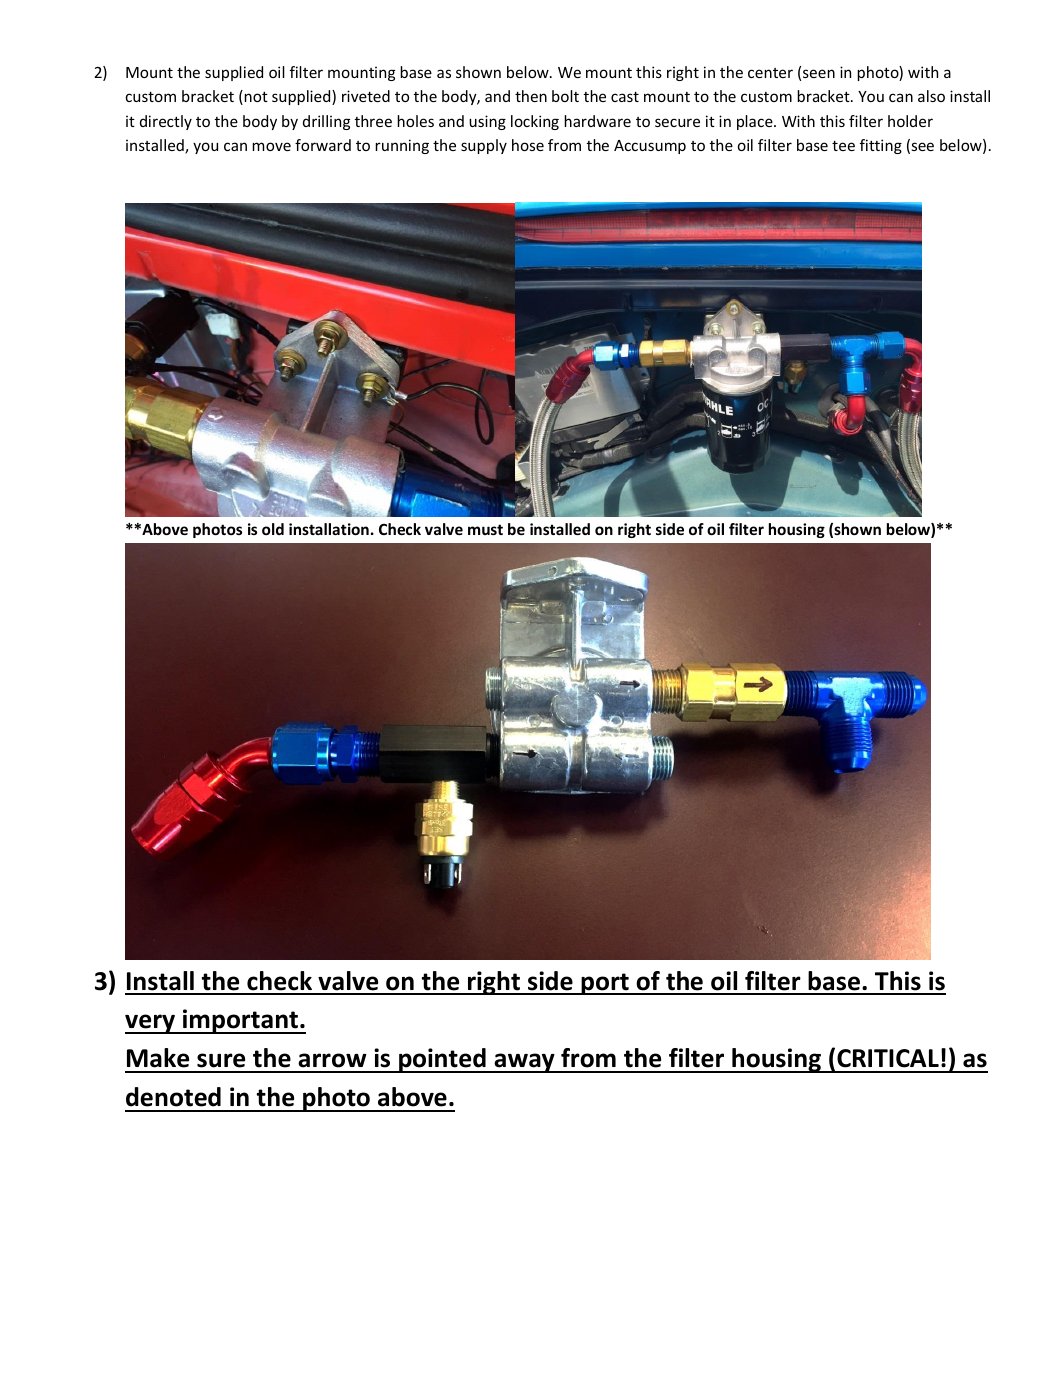
Mount the supplied oil filter mounting base as shown below. We mount this right in the center (seen in photo) with a custom bracket (not supplied) riveted to the body, and then bolt the cast mount to the custom bracket. You can also install it directly to the body by drilling three holes and using locking hardware to secure it in place. With this filter holder installed, you can move forward to running the supply hose from the Accusump to the oil filter base tee fitting (see below).
**Above photos is old installation. Check valve must be installed on right side of oil filter housing (shown below)**
3Step 3Install and orient the check valve
Install the check valve on the right side port of the oil filter base. This is very important. Make sure the arrow is pointed away from the filter housing (CRITICAL!) as denoted in the photo above.
4Step 4Install the heat exchange delete
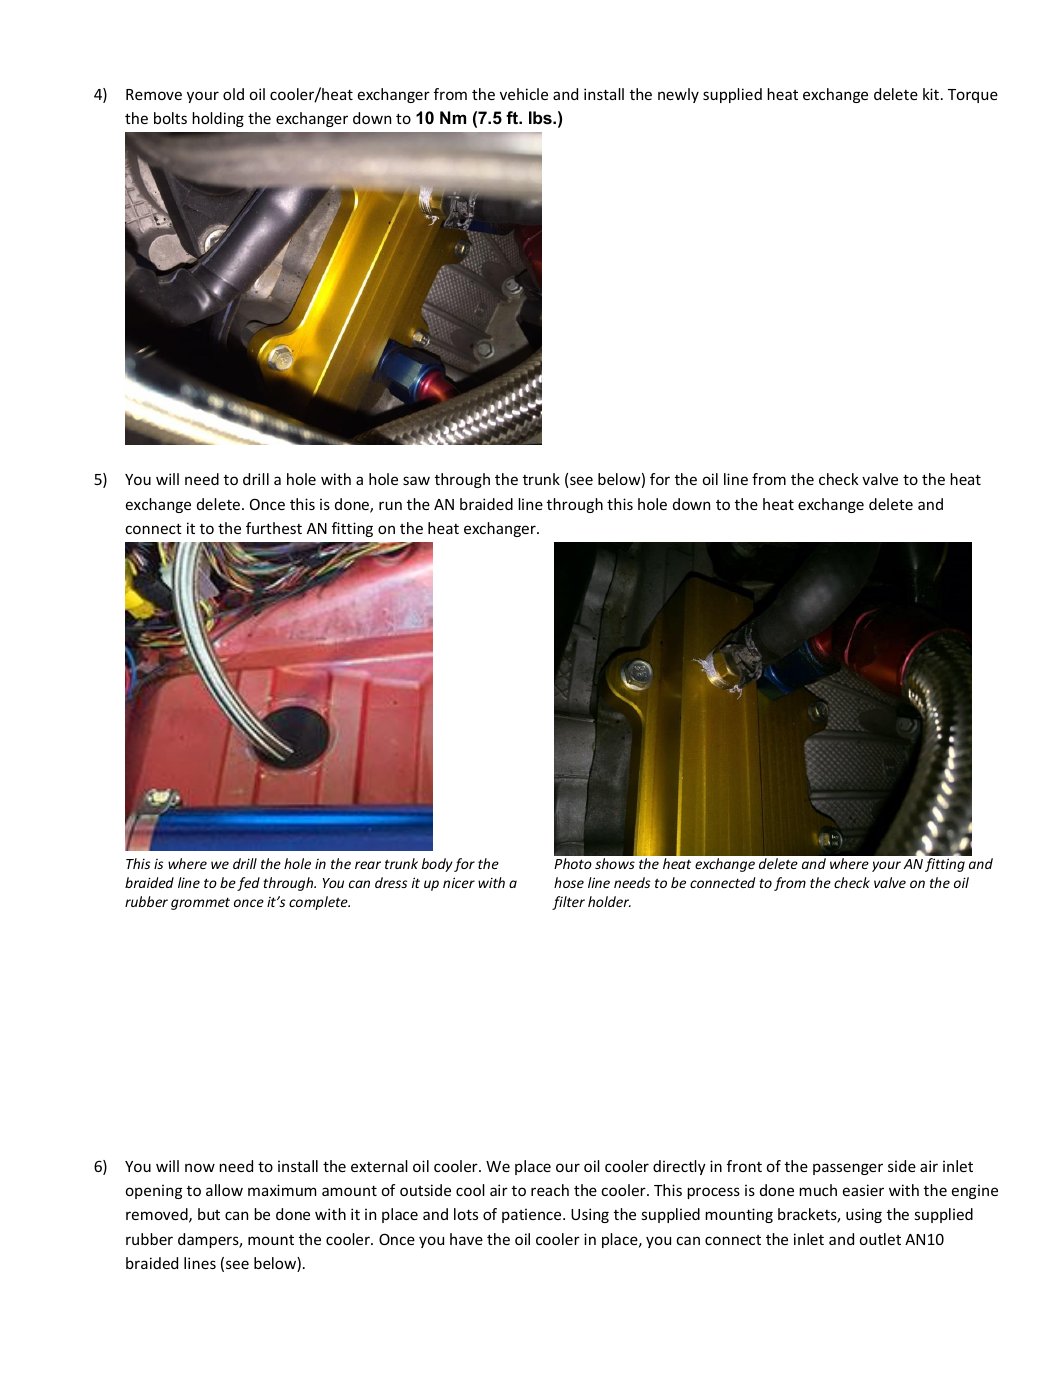
Remove your old oil cooler/heat exchanger from the vehicle and install the newly supplied heat exchange delete kit. Torque the bolts holding the exchanger down to 10 Nm (7.5 ft. lbs.)
5Step 5Route the line through the trunk
You will need to drill a hole with a hole saw through the trunk (see below) for the oil line from the check valve to the heat exchange delete. Once this is done, run the AN braided line through this hole down to the heat exchange delete and connect it to the furthest AN fitting on the heat exchanger.
This is where we drill the hole in the rear trunk body for the Photo shows the heat exchange delete and where your AN fitting and braided line to be fed through. You can dress it up nicer with a hose line needs to be connected to from the check valve on the oil rubber grommet once it’s complete. filter holder.
6Step 6Mount and connect the external cooler
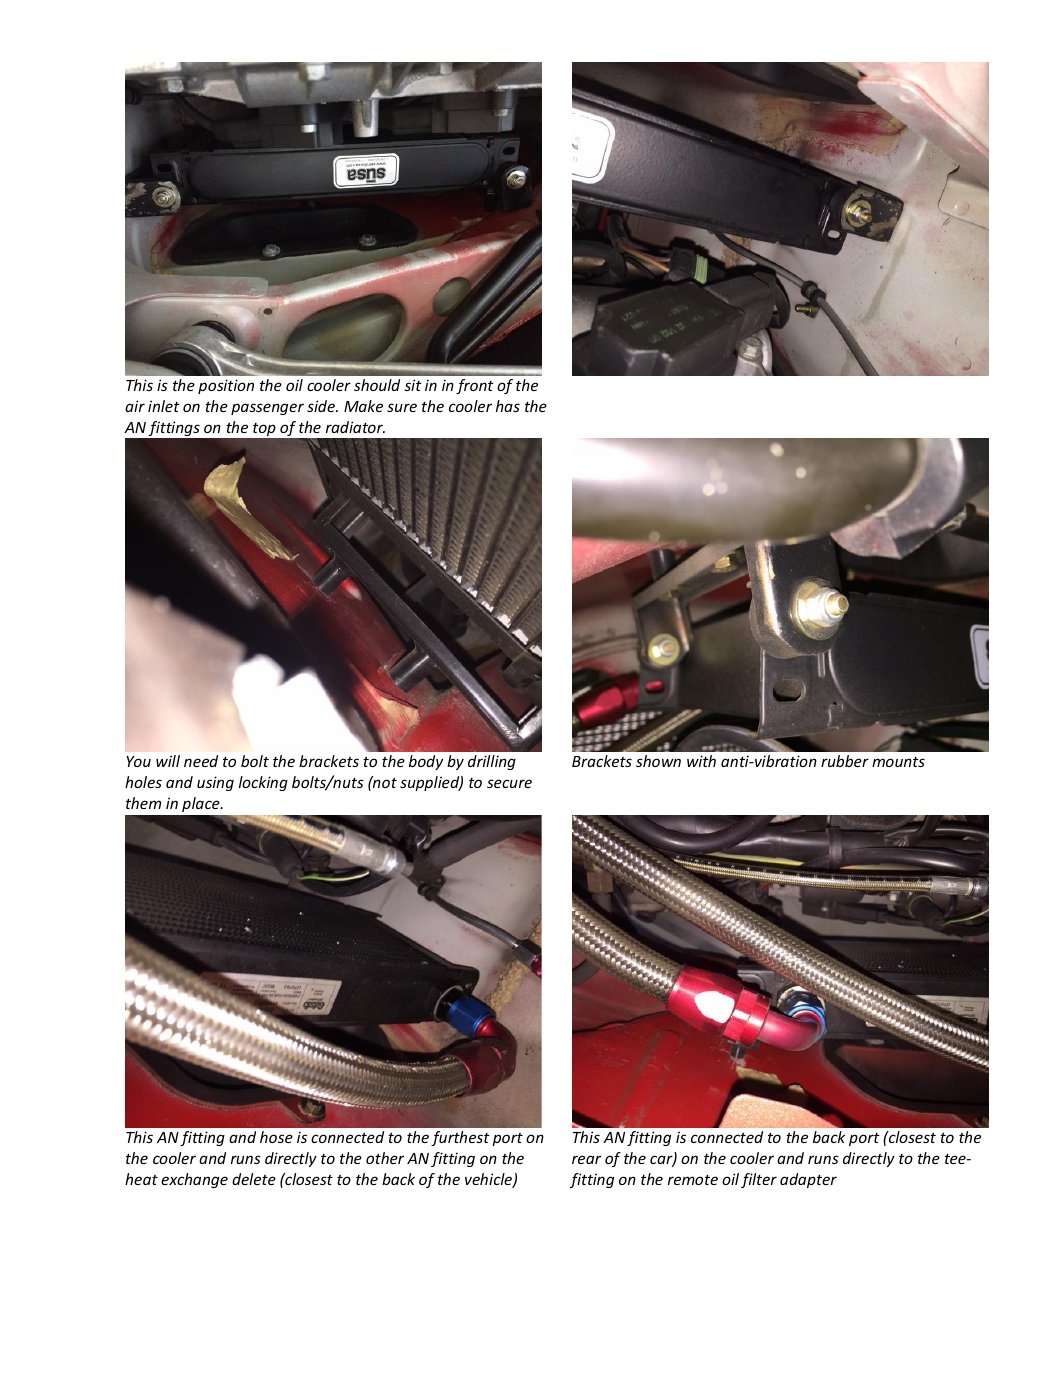
You will now need to install the external oil cooler. We place our oil cooler directly in front of the passenger side air inlet opening to allow maximum amount of outside cool air to reach the cooler. This process is done much easier with the engine removed, but can be done with it in place and lots of patience. Using the supplied mounting brackets, using the supplied rubber dampers, mount the cooler. Once you have the oil cooler in place, you can connect the inlet and outlet AN10 braided lines (see below).
This is the position the oil cooler should sit in in front of the air inlet on the passenger side. Make sure the cooler has the AN fittings on the top of the radiator.
You will need to bolt the brackets to the body by drilling Brackets shown with anti-vibration rubber mounts holes and using locking bolts/nuts (not supplied) to secure them in place.
This AN fitting and hose is connected to the furthest port on This AN fitting is connected to the back port (closest to the the cooler and runs directly to the other AN fitting on the rear of the car) on the cooler and runs directly to the tee- heat exchange delete (closest to the back of the vehicle) fitting on the remote oil filter adapter
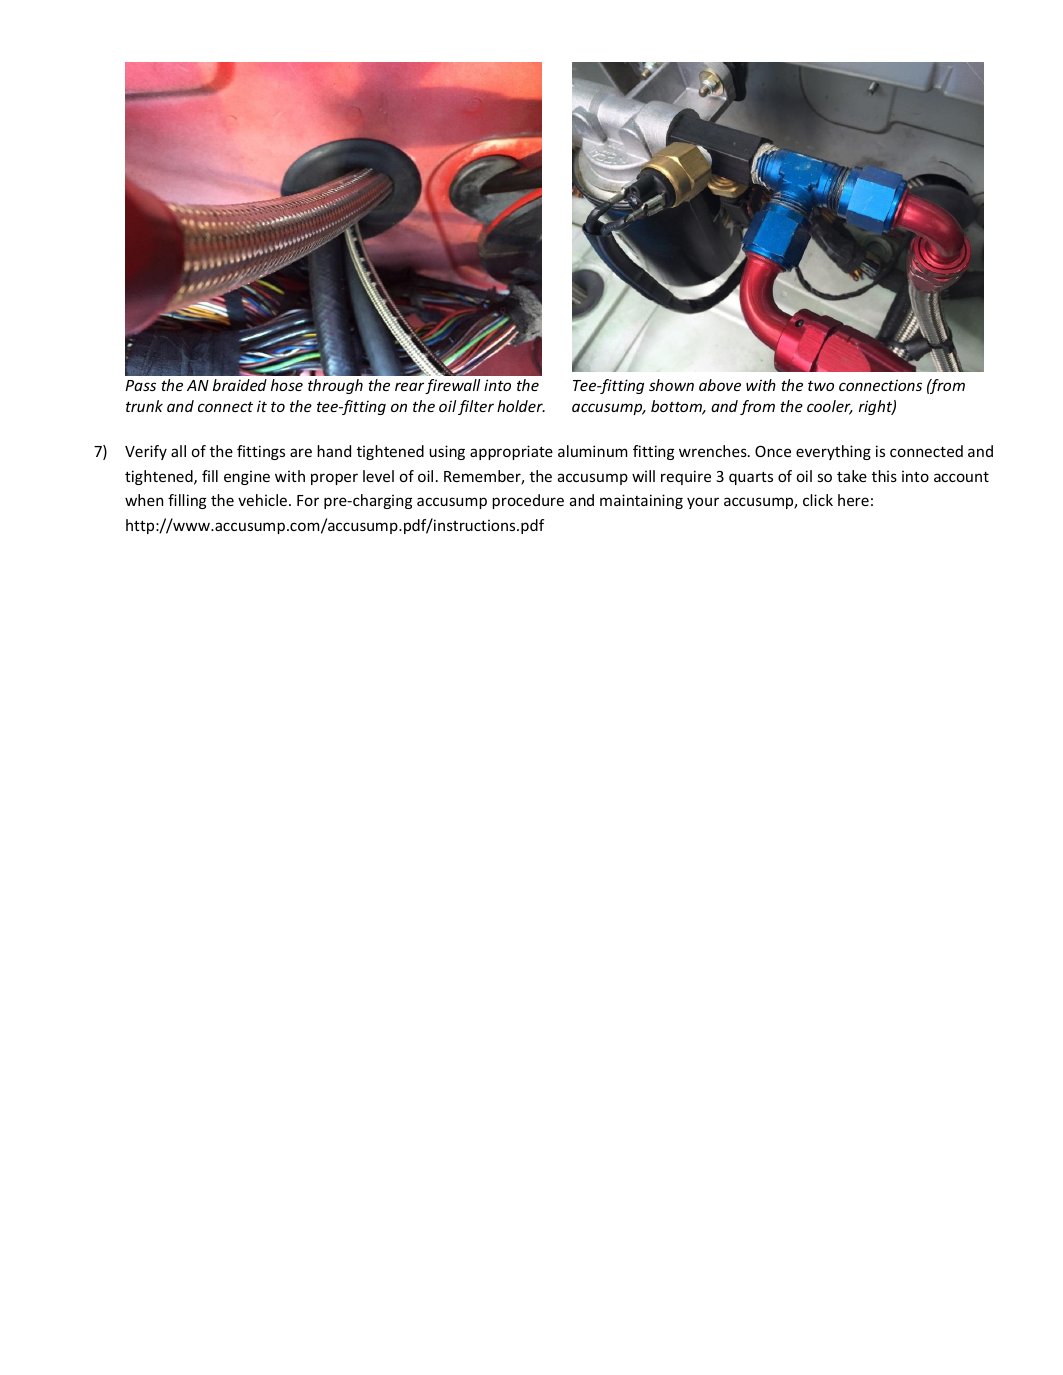
Pass the AN braided hose through the rear firewall into the Tee-fitting shown above with the two connections (from trunk and connect it to the tee-fitting on the oil filter holder. accusump, bottom, and from the cooler, right)
7Step 7Check connections and follow pre-charge instructions
Verify all of the fittings are hand tightened using appropriate aluminum fitting wrenches. Once everything is connected and tightened, fill engine with proper level of oil. Remember, the accusump will require 3 quarts of oil so take this into account when filling the vehicle. For pre-charging accusump procedure and maintaining your accusump, click here: http://www.accusump.com/accusump.pdf/instructions.pdf